
I'm going to walk you through configuring ASP.NET Core Identity to use your own database schema instead of the default tables and columns provided. Doing this only changes the schema, so it still allows you to rely on password hashing, cookie authentication, anti-forgery, roles, claims, and all the other goodies that come with identity. One of the primary reasons for doing this is that you might only need a small percentage of the features provided by identity, or you might already have an existing database schema that you cannot easily change. Whatever the reason, the default schema provides a rich model, but you aren't required to utilize it all, and you can configure identity to use your own instead.
Let's take a look at the default schema provided.
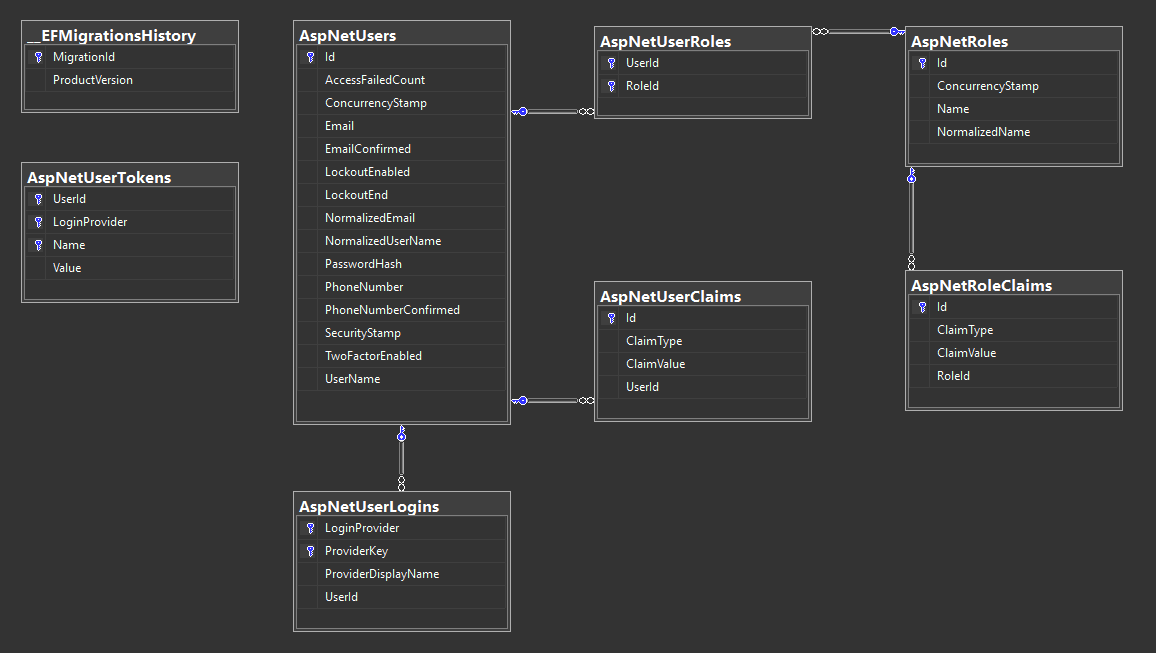
We are going to shoot for something a bit more simple, such as only requiring the necessary bits for our application to be able to sign in and out users. This is where we will start, but note that adding in the remaining functionality you might need once you learn this is just adding the extra bits (such as user claims). It's pretty simple.

NOTE: Even though we are implementing our own schema, you must implement some basic scaffolding for roles. This doesn't mean you have to use them, as a matter of fact, we can leave most of the role based functionality not implemented and even disregard having a schema, but I will include them in this sample because it demonstrate a little more than just the basic user functionality.
To accomplish our goal of implementing a custom storage provider with our own schema, we will perform these tasks.
- Create our code-first classes
a.DataContext : DbContext
b.User
c.UserRole
d.Role - Create and implement a
UserStore - Create and implement a
RoleStore - Plug-in our types as replacements in
Startup.ConfigureServices - Test the new implementation
Create our code-first model
DataContext
namespace App.Data
{
    using Microsoft.EntityFrameworkCore;

    public class DataContext : DbContext
    {
        public DataContext(DbContextOptions<DataContext> options) : base(options)
        {
        }

        public DbSet<Role> Roles
        {
            get;
            set;
        }

        public DbSet<User> Users
        {
            get;
            set;
        }

        public DbSet<UserRole> UserRoles
        {
            get;
            set;
        }
    }
}
User
namespace App.Data
{
    using System.Collections;
    using System.Collections.Generic;
    using System.ComponentModel.DataAnnotations;
    using System.ComponentModel.DataAnnotations.Schema;

    [Table("User")]
    public class User
    {
        [Key, Required]
        public int Id { get; set; }

        [Required, MaxLength(128)]
        public string UserName { get; set; }

        [Required, MaxLength(1024)]
        public string PasswordHash { get; set; }

        [Required, MaxLength(128)]
        public string Email { get; set; }

        [MaxLength(32)]
        public string FirstName { get; set; }

        [MaxLength(1)]
        public string MiddleInitial { get; set; }

        [MaxLength(32)]
        public string LastName { get; set; }

        public virtual ICollection<UserRole> UserRoles { get; set; }
    }
}
UserRole
namespace App.Data
{
    using System.ComponentModel.DataAnnotations;
    using System.ComponentModel.DataAnnotations.Schema;

    [Table("UserRole")]
    public class UserRole
    {
        [Key, Required]
        public int Id { get; set; }

        [Required, ForeignKey(nameof(User))]
        public int UserId { get; set; }

        [Required, ForeignKey(nameof(Role))]
        public int RoleId { get; set; }

        public virtual Role Role { get; set; }
        public virtual User User { get; set; }
    }
}
Role
namespace App.Data
{
    using System.Collections;
    using System.Collections.Generic;
    using System.ComponentModel.DataAnnotations;
    using System.ComponentModel.DataAnnotations.Schema;

    [Table("Role")]
    public class Role
    {
        [Key, Required]
        public int Id { get; set; }

        [Required]
        public string Name { get; set; }

        public virtual ICollection<UserRole> UserRoles { get; set; }
    }
}
IMPORTANT: I want to note that in many of the ASP.NET Core samples and documentation articles, they use ApplicationDbContext and ApplicationUser classes, and they store these in the ASP.NET Core project assembly itself. This is NOT necessary. It seems they have done this to encapsulate only a portion of the model required for identity into the application layer, but everything you see here can go into a separate App.Data data layer project if you wish. If you're working with a layered architecture this is nice, and it also means you can use your existing Entity Framework classes and DbContext if you already have them.
Create and implement UserStore
This is what we will plug into the ASP.NET Core Identity system to use our own functionality. The UserStore class is used by identity to perform actions, like creating or finding users. If you're not using Entity Framework, this is where you would implement the appropriate data access logic for users. Here, you only need to implement what you need, but note there are some methods that must be implemented, at least with some sort of default implementation for all of this to work. Here is our bare-bone implementation.
namespace App.Identity
{
    using System;
    using System.Linq;
    using System.Threading;
    using System.Threading.Tasks;
    using Microsoft.AspNetCore.Identity;
    using Microsoft.EntityFrameworkCore.Extensions.Internal;

    public class UserStore : IUserStore<User>, IUserPasswordStore<User>
    {
        private readonly DataContext db;

        public UserStore(DataContext db)
        {
            this.db = db;
        }

        public void Dispose()
        {
            Dispose(true);
            GC.SuppressFinalize(this);
        }

        protected virtual void Dispose(bool disposing)
        {
            if (disposing)
            {
                db?.Dispose();
            }
        }

        public Task<string> GetUserIdAsync(User user, CancellationToken cancellationToken)
        {
            return Task.FromResult(user.Id.ToString());
        }

        public Task<string> GetUserNameAsync(User user, CancellationToken cancellationToken)
        {
            return Task.FromResult(user.UserName);
        }

        public Task SetUserNameAsync(User user, string userName, CancellationToken cancellationToken)
        {
            throw new NotImplementedException(nameof(SetUserNameAsync));
        }

        public Task<string> GetNormalizedUserNameAsync(User user, CancellationToken cancellationToken)
        {
            throw new NotImplementedException(nameof(GetNormalizedUserNameAsync));
        }

        public Task SetNormalizedUserNameAsync(User user, string normalizedName, CancellationToken cancellationToken)
        {
            return Task.FromResult((object) null);
        }

        public async Task<IdentityResult> CreateAsync(User user, CancellationToken cancellationToken)
        {
            db.Add(user);

            await db.SaveChangesAsync(cancellationToken);

            return await Task.FromResult(IdentityResult.Success);
        }

        public Task<IdentityResult> UpdateAsync(User user, CancellationToken cancellationToken)
        {
            throw new NotImplementedException(nameof(UpdateAsync));
        }

        public async Task<IdentityResult> DeleteAsync(User user, CancellationToken cancellationToken)
        {
            db.Remove(user);

            int i = await db.SaveChangesAsync(cancellationToken);

            return await Task.FromResult(i == 1 ? IdentityResult.Success : IdentityResult.Failed());
        }

        public async Task<User> FindByIdAsync(string userId, CancellationToken cancellationToken)
        {
            if (int.TryParse(userId, out int id))
            {
                return await db.Users.FindAsync(id);
            }
            else
            {
                return await Task.FromResult((User) null);
            }
        }

        public async Task<User> FindByNameAsync(string normalizedUserName, CancellationToken cancellationToken)
        {
            return await db.Users
                           .AsAsyncEnumerable()
                           .SingleOrDefault(p => p.UserName.Equals(normalizedUserName, StringComparison.OrdinalIgnoreCase), cancellationToken);
        }

        public Task SetPasswordHashAsync(User user, string passwordHash, CancellationToken cancellationToken)
        {
            user.PasswordHash = passwordHash;

            return Task.FromResult((object) null);
        }

        public Task<string> GetPasswordHashAsync(User user, CancellationToken cancellationToken)
        {
            return Task.FromResult(user.PasswordHash);
        }

        public Task<bool> HasPasswordAsync(User user, CancellationToken cancellationToken)
        {
            return Task.FromResult(!string.IsNullOrWhiteSpace(user.PasswordHash));
        }
    }
}
DataContext will be automatically created and passed in via dependency injection whenever a UserStore is required by ASP.NET Core, and the rest is basic data access using EF, and basic default implementations for each of the methods. Ultimately it is up to you to determine what you need to implement, but note that we implemented IUserStore<User> and IUserPasswordStore<User>. The former is a redundant declaration for readability, but the latter is what you must implement at a minimum. If you want to implement other functionality, ASP.NET Core provides a number of optional interfaces you may choose implement.
- IUserRoleStore
- IUserClaimStore
- IUserPasswordStore
- IUserSecurityStampStore
- IUserEmailStore
- IPhoneNumberStore
- IQueryableUserStore
- IUserLoginStore
- IUserTwoFactorStore
- IUserLockoutStore
Create and implement RoleStore
All we have to do here for basic log in/out functionality is just define a RoleStore, but we don't need to implement anything. If you wan to use roles, and just like the implementation of the UserStore, you simply plug your data access logic in the appropriate methods.
namespace App.Identity
{
    using System.Threading;
    using System.Threading.Tasks;
    using Data;
    using Microsoft.AspNetCore.Identity;

    public class RoleStore : IRoleStore<UserRole>
    {
        public void Dispose()
        {
        }

        public Task<IdentityResult> CreateAsync(UserRole role, CancellationToken cancellationToken)
        {
            throw new System.NotImplementedException();
        }

        public Task<IdentityResult> UpdateAsync(UserRole role, CancellationToken cancellationToken)
        {
            throw new System.NotImplementedException();
        }

        public Task<IdentityResult> DeleteAsync(UserRole role, CancellationToken cancellationToken)
        {
            throw new System.NotImplementedException();
        }

        public Task<string> GetRoleIdAsync(UserRole role, CancellationToken cancellationToken)
        {
            throw new System.NotImplementedException();
        }

        public Task<string> GetRoleNameAsync(UserRole role, CancellationToken cancellationToken)
        {
            throw new System.NotImplementedException();
        }

        public Task SetRoleNameAsync(UserRole role, string roleName, CancellationToken cancellationToken)
        {
            throw new System.NotImplementedException();
        }

        public Task<string> GetNormalizedRoleNameAsync(UserRole role, CancellationToken cancellationToken)
        {
            throw new System.NotImplementedException();
        }

        public Task SetNormalizedRoleNameAsync(UserRole role, string normalizedName, CancellationToken cancellationToken)
        {
            throw new System.NotImplementedException();
        }

        public Task<UserRole> FindByIdAsync(string roleId, CancellationToken cancellationToken)
        {
            throw new System.NotImplementedException();
        }

        public Task<UserRole> FindByNameAsync(string normalizedRoleName, CancellationToken cancellationToken)
        {
            throw new System.NotImplementedException();
        }
    }
}
Plug in our functionality into Startup.ConfigureServices
Here we need to tell ASP.NET Core Identity how to use our custom storage provider implementation. There are just a couple of things we need to wire up.
Register our context as a service
services.AddDbContext<DataContext>(options => options.UseSqlServer(Configuration.GetConnectionString("Default")));
Tell identity to use our custom classes for users and roles
services.AddIdentity<User, UserRole>()
        .AddDefaultTokenProviders();
Tell identity to use our custom storage provider for users
services.AddTransient<IUserStore<User>, UserStore>();
Tell identity to use our custom storage provider for roles
services.AddTransient<IRoleStore<UserRole>, RoleStore>();
When you're done you should have something similar to the following.
public void ConfigureServices(IServiceCollection services)
{
    services.AddMvc();
    services.AddDbContext<DataContext>(options => options.UseSqlServer(Configuration.GetConnectionString("Default")));
    services.AddIdentity<User, UserRole>()
            .AddDefaultTokenProviders();
    services.AddTransient<IUserStore<User>, UserStore>();
    services.AddTransient<IRoleStore<UserRole>, RoleStore>();
    services.ConfigureApplicationCookie(options =>
    {
        options.Cookie.HttpOnly = true;
        options.LoginPath = "/Login";
        options.LogoutPath = "/Logout";
    });
}
Test our implementation
Now we can perform one of the most basic tasks to ensure the storage provider works. We will do this by creating a user when the application is in development, and if it doesn't already exist. Here is a sample, but the important thing here is to make sure you have enabled authentication by calling app.UseAuthentication. Some of the other method calls may not apply to your application, such as MapSpaFallbackRoute.
NOTE: Make sure your database exists before you run a test. In my case I am using EF migrations and NuGet to run Add-Migration and Update-Database to produce my database and its schema, but you might choose to do something different, such as use a Database Project.
public void Configure(IApplicationBuilder app, IHostingEnvironment env, DataContext db, SignInManager<User> s)
{
    if (env.IsDevelopment())
    {
        app.UseDeveloperExceptionPage();
        app.UseBrowserLink();

        if (s.UserManager.FindByNameAsync("dev").Result == null)
        {
            var result = s.UserManager.CreateAsync(new User
                                        {
                                            UserName = "dev",
                                            Email = "dev@app.com"
                                        }, "Aut94L#G-a").Result;
        }
    }

    app.UseAuthentication();
    app.UseStaticFiles();
    app.UseMvc(routes =>
    {
        routes.MapRoute("default", "{controller=Home}/{action=Index}/{id?}");
        routes.MapSpaFallbackRoute("spa-fallback", new {controller = "Home", action = "Index"});
    });
}
Run your application and go look at your user table and verify the row now exists.
Final Thoughts
In my project, I have UserStore and RoleStore in a Identity folder at the root of my ASP.NET Core project (e.g. App.Identity.UserStore), while DataContext, User, UserRole, and Role are my EF POCO classes that are in a separate App.Data class library project (as my data layer of the product). It really doesn't matter how you organize these classes to implement a custom storage provider, but I wanted to stress to developers not to get too hung up on the ApplicationDbContext and ApplicationUser that are presented in most of the documentation and sample articles.
This is also just a small taste of what you can do with identity, but for me I only needed a sliver of the functionality, and I wanted to be able to have full control over the database schema. You CAN, in fact, actually re-map many of the default ASP.NET Core Identity columns by using a Fluent configuration in the DbContext, but I found you might as well implement it this way, it's not much more work.
Related Posts
 Multiple ASP.NET apps under the same host and port in Visual Studio with IIS Express and Webpack Dev Server Proxy
- ViewModel constructors and inheritance by extending kendo.data.ObservableObject
 Exploring Active Record as a base for business entities in a business logic layer with Entity Framework
- Using DataTestMethod and DataRow to pass parameters to a unit test and prevent duplicating test methods
- Building SSDT SSRS projects (.rptproj) with a build server (TeamCity)
- Threads, locks, deadlocks, race conditions, and thread safety in multi-threaded code
51 Comments
Leave a Comment
You must be logged in to post a comment.
Pingback: blue cialis pill
Pingback: female cialis
Pingback: 100 mg viagra cost
Pingback: viagra sildenafil 25mg
Pingback: 25mg sildenafil reddit
Pingback: cialis 5mg price comparison
Pingback: viagra dosage 75mg
Pingback: usa online casino real money
Pingback: cialis 20
Pingback: where to get cialis
Pingback: get cialis
Pingback: street value viagra 50mg
Pingback: 100mg sildenafil
Pingback: viagra 25mg price
Pingback: sildenafil citrate 100mg tab
Pingback: how ginseng helps men
Pingback: is there generic cialis
Pingback: buy sildenafil 50mg
Pingback: cialis pastilla
Pingback: viagra 50 milligrams
Pingback: clomid 50mg for male
Pingback: viagra 25 mg sildenafil citrate
Hi
This work in core6??
Pingback: What is migration in asp net? – Lusocoder
Wonderful! Thank you.
Between this and Justin.AspNetCore.LdapAuthentication, I was able to user our existing Users and Roles with LDAP authentication and Identity
Thanks so much David! Your example and explanations were very clear. Had your demo up and running quickly.
Thanks a ton for the tutorial. It was very good and just what I needed. I am new to .Net CORE and coding in general and found this to be a simple and straightforward explanation of what seemed very complex when I started looking into it. I implemented it successfully and the test user data populated in my database.
How do I add in ‘login’ and ‘register’ views? I tried to add in the standard Identity ‘_LoginPartial.cshtml’, but the routing doesn’t seems to be working as it just redirects back to my home page. I have these two lines in Startup.cs :
options.LoginPath = “/Login”;
options.LogoutPath = “/Logout”;
Do I need to add the views and a controller to handle users?
I can authentication but
var user = await _userManager.GetUserAsync(User); that’s code return null how implement this.
How can use our database table in the signmanager and usermanagaer
Hello John,
SignInManager and UserManager use generics. You can get an instance of SIgnInManager with your custom user entity type if you specify it in the constructor of the class where you need it:
For instance (sample constructor of an API Controller):
public XYZController(DBContext context, SignInManager signInManager)
{
…
}
And an instance of UserManager can easily be obtained by calling signInManager.UserManager. Also this instance will use your custom entity type then.
Of course it’s necesssary to apply the steps David described in this post first.
All best!
Sorry, the example is not correct!
It should be
public XYZController(DBContext context, SignInManager signInManager)
{
…
}
That is, the SignInManager requires a generic type Parameter — for which you specify your own user type.
I see I cannot enter angle brackets; therefore, the Code is not displayed correctly.
One more try:
public XYZController(DBContext context, SignInManager -ANGLE BRACKET- CUSTOM USER ENTITY TYPE -ANGLE BRACKET- signInManager)
{
…
}
Hi, can you share working sample please?
How to implement LoginController to make a login and authenticate?
Hello, Can you please post a working example?
Thank you so much for the post on ASP.NET Core Identity and Entity Framework Core. It helps me a lot.
Great Ports !
It helps me a lot
thank you
Thanks for this amazing post! This was a huge help for the work on our project!
I have one remark not directly related to the topic:
The suggested query for selecting a user by name looks like this:
public async Task FindByNameAsync(string normalizedUserName, CancellationToken cancellationToken)
{
return await db.Users
.AsAsyncEnumerable()
.SingleOrDefault(p => p.UserName.Equals(normalizedUserName, StringComparison.OrdinalIgnoreCase), cancellationToken);
}
To me it seems that this query requires all rows of the Users table to be loaded before the condition to select by username is applied. This for more than one reason if I see things correctly:
(1) the use of AsAsyncEnumerable() here case causes Entity Framework to load all table rows. C.f. the link at the end of my comment. (My observation was that if a where clause is used first and AsAsyncEnumerable() is called on its result, then things seem to be different.)
(2) the String.Equals() method seems not to translate to SQL, therefore requiring to load all data in order to apply the string comparison at the application level.
(3) SingleOrDefault() operates on an Enumerable, therefore using this method instead of where seems to require the use of AsAsyncEnumerable().
The following query translates to a SQL SELECT with a correct WHERE condition:
db.Users.
.Where(p => UserName == “admin”)
.ToAsyncEnumerable()
.SingleOrDefault()
(I used .NET Core 2.2 with Entity Framework Core and MS SQL.)
One of my sources for realizing this issue in the first place was:
https://medium.com/@hoagsie/youre-all-doing-entity-framework-wrong-ea0c40e20502
Perhaps you are aware of this; and sorry discussing a side topic. However, maybe this comment might help other users. In particular if one has a very big user table, the performance issue is certainly relevant.
Thanks again for your great article!
Actually, I couldn’t see the point of that ToAsyncEnumerable at all. I just removed it.
David,
This saved me a ton of time. I’m getting up to speed on Identity and like you did not need all the features and wanted to keep it simple and in my singe database.
Thank you so much (not only informative but very clear and to the point).
I’ve donated $50 to the Cancer Society after implementing what you’ve shown me – to pay it back 🙂
Thank you!
This line:
services.AddTransient<IRoleStore, RoleStore>();
gives a compiler error:
Exception: Could not resolve a service of type Microsoft.AspNetCore.Identity.SignInManager
I’m assuming it should be:
services.AddTransient<IRoleStore, RoleStore>();
which does compile. But then I get a runtime error:
InvalidOperationException: Unable to resolve service for type ‘Microsoft.AspNetCore.Identity.IRoleStore`1[Api.Core.Entities.UserRole]’ while attempting to activate ‘Microsoft.AspNetCore.Identity.AspNetRoleManager`1[Api.Core.Entities.UserRole]’.
What am I missing?
D’oh, just found my error in RoleStore. Nevermind
I followed your example and everthing works perfectly. However, I saved passwords with an other hash method and the authentification failed. How can I override the _signInManager.PasswordSignInAsync() and also the CheckPasswordASync() methods to put my own way to check it ?
I followed your example, I can create users and add everything to the database.
However, when I attempt to log in with a user with a Role attribute, I get access denied. What causes this?
[Authorize(Roles = “User”)]
public class HomeController : Controller
{
public IActionResult Index()
{
var user = new User();
return View();
}
you need to have a functionality that adds user to a role, I have the following in my code
///
/// Adds the user to role.
///
/// The user.
/// The user role.
///
public async Task AddUserToRoleAsync(ApplicationUser user, Role userRole)
{
var result = new IdentityResult();
try
{
// Add user to a role
var role = await _roleManager.FindByNameAsync(userRole.ToString());
if (role == null)
{
role = new IdentityRole(userRole.ToString());
await _roleManager.CreateAsync(role);
}
// Check if user is already assigned to a role
var isInRole = await _userManager.IsInRoleAsync(user, role.Name);
if (!isInRole)
{
result = await _userManager.AddToRoleAsync(user, role.Name);
}
}
catch (Exception ex)
{
// Log
_logger.LogError($”Could not log assign user {user.Email} to role {nameof(userRole)}”, ex);
// Re-throw
throw;
}
// Return
return result;
}
Hi.
Where do you add this functionality ?
where in the code please
Make sure you create the user with the identity api so the password is properly created, encrypted, and stored.
So, this uses my own tables in the database, but how do you prevent the creation of the UsersInRoles, Roles, Profiles, Memberships, Users, and Applications tables when the app runs?
That’s up to you, actually. If you have implemented this correctly, your DbContext should only have mapped in your new custom tables, but none of the standard identity ones. In EF Core, you can use the NuGet extensions to create a code-first migration that creates your database, or you can use a SSDT database project, or create the database manually.
Great post! better than a lot i have seen.
how can i implement this on a layered architecture where you cant see from the presentation classes like User, Or UserStore that are implemented on the data layer. i have been working in a solution but i dont know if ios the best one.
one part that is dificult to me to solve is the configuration on startup where startup dont have access to some information cause the business is in between the data and the presentation.
Thanks for the work on the blog.